As the world begins to operate more and more with digital assets, the amount of possibility for 3D models and experiences is compounding. One simply way to expand existing assets and resources into new digital frontiers is the utilisation of 3D scanning or modelling to represent physical objects in virtual space.
But how can we, an embedded media team devoted to learning and teaching audio-visual production, develop these resources?
Simple. By leveraging our incredible Digital Image Specialist – Anna Singleton
Photo-what-etry?
I wouldn’t be surprised if you haven’t heard the term photogrammetry before. Chances are, if you knew the term, you’d already be fanatically photographing the world and generating your own 3D models! The process is (theoretically) simple:
- Take several (read: thousands, if possible) photos of an object or space,
- Use photogrammetry software to identify unique features between each photo and stitch together a model, and
- Enjoy!
To make things even easier, recent advancements in graphics acceleration and an increasingly competitive market for software alternatives have all but removed the trial-and-error philosophy of foundational photogrammetry technique.
Popular software programs currently available include Metashape (Agisoft), RealityCapture (Epic Games), and the G.O.A.T., open-source Meshroom (AliceVision). And all of these tools can utilise any photo or video input, even from a mobile phone! But the biggest differentiating factor of quality in the resultant 3D model is the quality of the input.
Using Your Phone
Mobile phone cameras have significantly increased in quality over the past decade, and recent flagship offerings now offer professional grade functionalities. As such, this means you can use the phone in your pocket to scan your own models! You’ll want to capture photos of the object from as many angles as possible, but a simple method is to capture a dome of photos that mimics professional photogrammetry arrays:
- Choose a spot on the object to use as the starting position
- Take a sequence of photos, as you circle around the object. Ensure that at least 1/3 of the preceding image is in shot and that your camera’s auto-focus doesn’t change last minute
- Once returning to the starting position take a second photo at this location, move the camera up to the second height level, and take another photo
- Repeat Steps 2 – 3 until there is no height levels left
- Take a single photo from directly above
Your results from the above exercise will vary depending on the phone used, but will significantly increase with practice (there is a subtle art to learning how to best position your camera and identify ideal shots for different objects). But what if you want the resultant model to knock everyone’s socks off?
Using a Professional Photographer
with legitimate experience…
Now, this may not be an option for many people reading this but (if you happen to be or know an excellent photographer) your generated models can be dramatically improved. To put this to the test, we explored our capabilities for creating 3D learning and teaching materials within our photography studio.
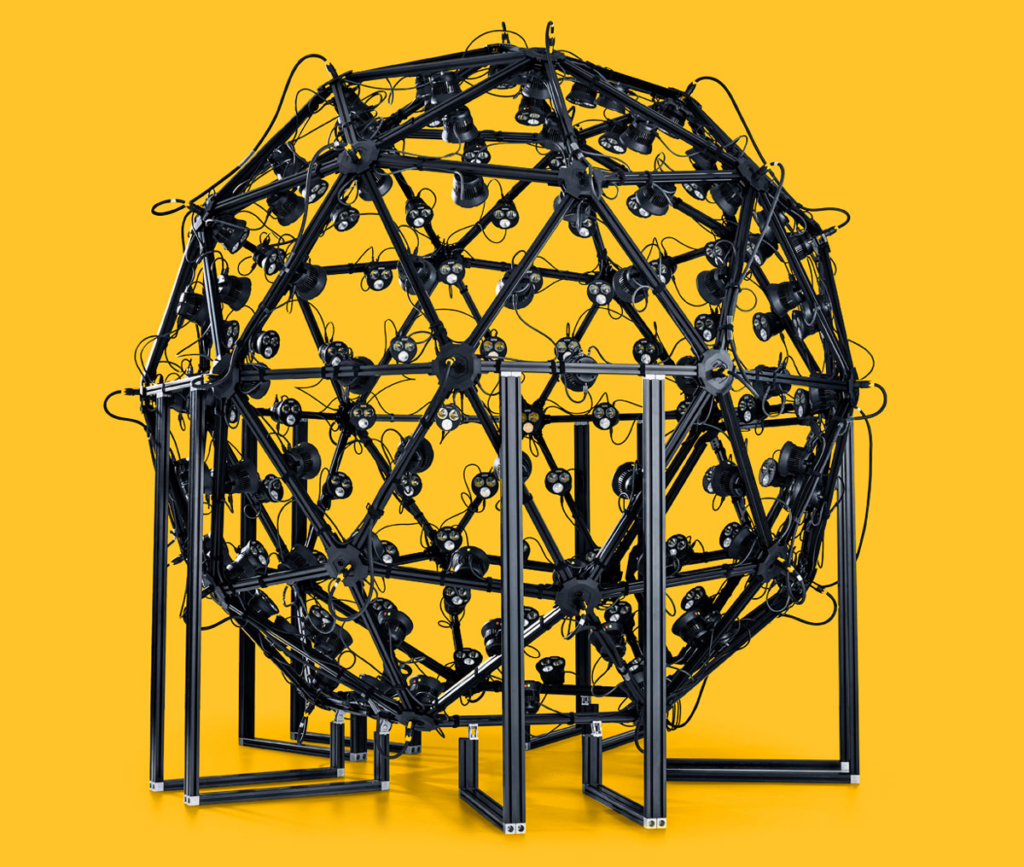
Our plan was to trick the photogrammetric software into thinking we had managed to evenly light the object from all sides while walking around it without capturing any equipment or surroundings. The issue is, we don’t own a photogrammetry array as pictured earlier in the blog…
The solution?
Place the object on a wheeled plinth and rotate it in front of a black background.
Using this lighting setup successfully reduced shadows on the object (from the camera’s view), while maintaining an interesting level of dynamics in the final image’s composition.
Rotating the object in front of a static background also worked as planned, with both Metashape and RealityCapture ignoring the unlit black sheet in the background. Furthermore, while this statue may not need any tracking markers (due to its high level of detail) extra track points were added by placing sticky notes in randomised patterns on the plinth.
And the result of this effort?